MATRICXPRO
Official User Guide
Smart materials · layered imperfections · paint masks · decals · trim sheets · version 2.0.0
CONTENTS
What's Inside
SECTION 01
What's New in 2.0
Version 2.0 is a rebuild rather than an update. If you are coming from 1.6, these are the changes that affect how you actually work.
Paint masks — the headline feature
Every imperfection layer can now be painted directly onto the mesh. Instead of a procedural mask covering the whole surface, you brush in exactly where rust, dirt, or scratches appear. See Section 13.
A curated material collection
25 authored materials ship inside the add-on — 13 metals, 4 plastics, 3 woods, 3 fabrics and 2 glasses. 17 of them arrive with a complete, hand-built imperfection stack already layered on.
Materials keep their own values
Each material now loads its own authored base colour and roughness. Switching from a red painted metal to Default Metal no longer carries the red across. A Reset Base Material button restores a material's shipped values if you overshoot.
External decal and trim sheet libraries
You can add your own folders of decals or trim sheets, and remove them again, from either the N-panel or Preferences. Trim sheets are not included with MatricX — this is how you supply them.
Everything else
- 15 imperfection types, including new Chip Damaged, Grunge, Leaking, and Bump Texture.
- Anti-tiling with an Auto mode that only pays the cost when an object is large enough to show repeats.
- Mask preview — view any layer's mask in isolation as greyscale.
- Reorderable authored stacks — preset layers can be restacked, and restored afterwards.
- Blender Extension package in addition to the legacy add-on ZIP.
- Minimum Blender version raised to 4.5.
Upgrading from 1.6: remove the old add-on and restart Blender before installing 2.0. MatricX 2.0 detects an older copy and disables it, migrating your saved asset-pack path, favourites and custom material catalog — but a restart is what guarantees old Python modules and keymaps are not left in memory.
SECTION 02
Introduction
MatricX PRO turns a clean model into a used one. It is built for hard-surface detailing, look development, game-asset presentation, and concept work — anywhere a surface needs a history rather than a flat shader.
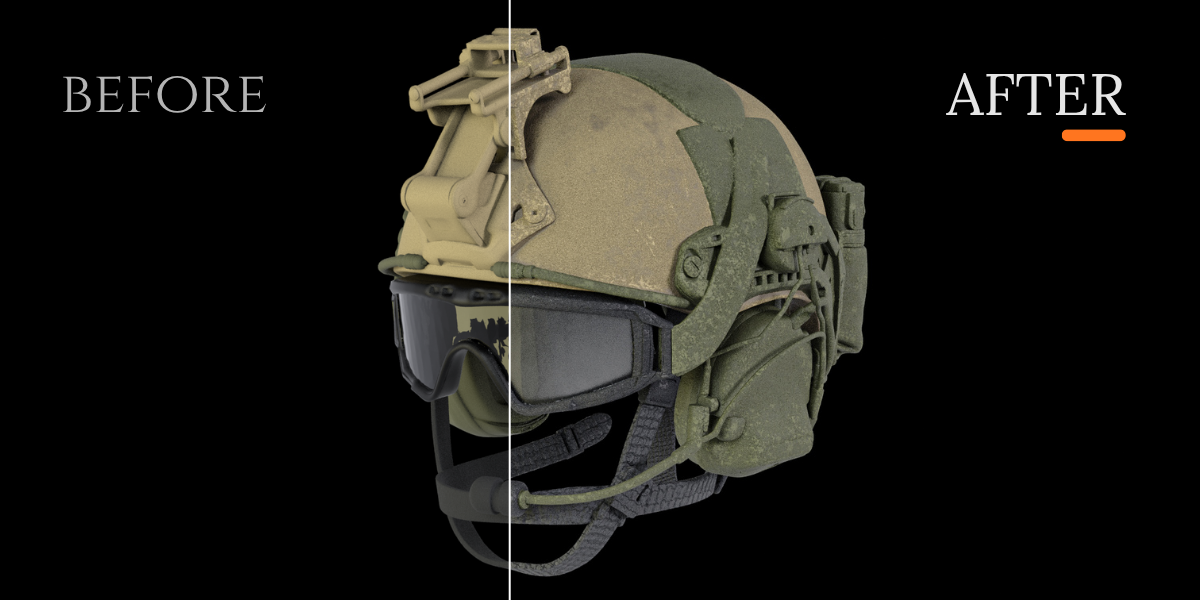
The add-on is organised into three workspaces:
- Materials — browse, apply, customise and layer materials and imperfections.
- Decals — place, project, colour and manage decals, plus trim sheets in Trims mode.
- Viewport — quick modelling colours and collection helpers.
Most controls update the active material immediately. Materials shared between objects stay linked until you explicitly make a copy.
The core idea: several restrained layers read as more realistic than one strong layer. A surface that has been touched, wiped, knocked and left outdoors has many faint stories on it, not one loud one.
SECTION 03
Installation and Asset Pack
The three downloads
| File | What it is |
|---|---|
MatricX_PRO_2.0.0_Addon.zip | The add-on, for Blender's classic Add-ons installer. |
MatricX_PRO_2.0.0_Blender_Extension.zip | The same add-on packaged as a Blender Extension. |
MatricX_Assets_2.0.0.zip | Runtime assets: materials, textures and the official decal library. |
Install one code package, not both. Never enable the legacy add-on and the extension at the same time.
Installing the add-on
As a classic add-on:
- Edit → Preferences → Add-ons.
- Open the dropdown menu and choose Install from Disk.
- Select
MatricX_PRO_2.0.0_Addon.zip. - Enable MatricX PRO if Blender does not enable it for you.
As an extension:
- Edit → Preferences → Get Extensions.
- Top-right dropdown → Install from Disk.
- Select
MatricX_PRO_2.0.0_Blender_Extension.zip.
Then press N in the 3D Viewport and open the MatricX PRO tab.
Installing the asset pack
Extract MatricX_Assets_2.0.0.zip anywhere you like — a fast local drive is ideal.
Placing it beside the add-on folder lets MatricX find it automatically.
If MatricX does not find it, open the MatricX panel, expand Runtime Assets and click Locate Asset Pack. You may select the pack folder, its parent, or one of its subfolders. The path is stored outside the add-on, so reinstalling — or switching between the add-on and extension packages — does not lose it.
Studio deployments: set the MATRICX_ASSET_ROOT environment variable to a
shared asset-pack location and every workstation picks it up.
Material preview thumbnails are bundled inside the add-on, so the browser stays visual even before the asset pack is connected.
SECTION 04
Interface Overview
Press N in the 3D Viewport and select the MatricX PRO tab. Three workspace buttons sit at the top of the panel.
Materials
Material assignment, base surface controls, Material Looks, and the Imperfection Studio.
Decals
Two modes: Decals for individual placed objects, Trims for trim sheet regions applied to selected faces.
Viewport
Fast modelling colours, quick swatches, and collection helpers.
The panel follows your selection
Select an object carrying a MatricX material and the panel loads its settings, including the full imperfection stack. Select a decal and the panel switches to that decal's placement, opacity, projection and colour controls. Controls that do not apply to the current selection are hidden or greyed out rather than left to mislead you.
SECTION 05
Materials Workspace
The basic loop
- Select one or more mesh objects.
- Open the Materials workspace.
- Pick a Material category.
- Choose a preset from the dropdown, or browse thumbnails in the Material Collection.
- Adjust the surface controls.
- Click Apply Material.
Categories
| Category | Notes |
|---|---|
| Metal | Default Metal, Perl Black, and the 13-material metal collection. |
| Plastic | Default Plastic, Perl Black Plastic, and 4 authored plastics. |
| Wood | Default, Dark, Light, Dirt Wood, and 3 shiny woods. |
| Fabric | 3 procedural fabrics. These sample through the mesh UV map. |
| Glass | Custom glass with smudge and crack controls, plus 2 authored glasses. |
| Rubber & Leather | Rubber and leather variants. |
| Special Mat | Car paint, camo, gradients, and other specialised shaders. |
| Emission | Glow surfaces with strength control. |
| Custom Material | Your own imported PBR texture sets. See Section 14. |
The material browser
The thumbnail browser supports text search, favourites, recents, adjustable thumbnail size, and previous/next navigation. Use the browser when you are exploring; use the category dropdown when you already know what you want.
SECTION 06
The 2.0 Material Collection
25 authored materials ship inside the add-on itself. Most arrive with a complete imperfection stack already built — apply one and it is finished, not a starting point.
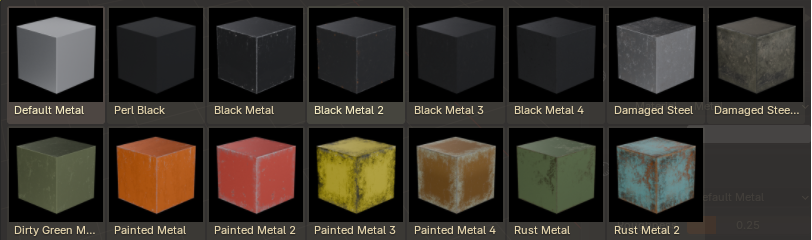


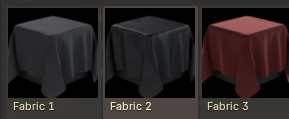
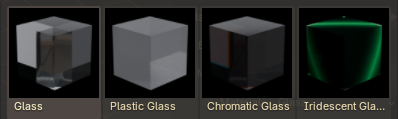
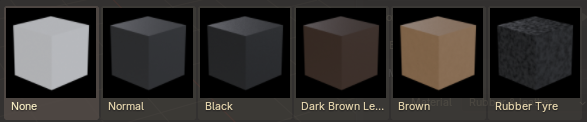
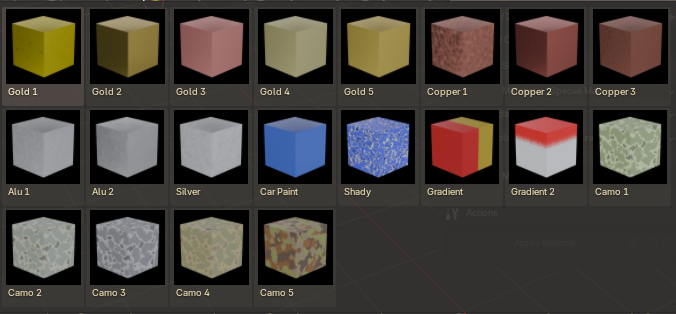
Authored stacks are protected, not frozen. On the 17 materials that ship with layers, you cannot add, delete or rename layers — but you can reorder them, tune every setting, and press Restore Authored Stack to put the original recipe back.
SECTION 07
Base Surface Controls and Reset
Under Material Setup you get the controls that define the surface underneath the imperfections — typically Base Color and Roughness, plus Bevel on the default materials.
Every material brings its own values
When you apply a material, MatricX reads that material's authored colour and roughness and loads them into the panel. Applying Painted Metal 2 gives you its red; switching to Default Metal gives you Default Metal's grey. Values no longer bleed from one material to the next.
Grouped materials
Some materials — the plastics, for example — expose their surface through a Material Group Controls box instead, with Base Color, Metallic, Roughness and Coat taken straight from the authored shader.
New in 2.0 — Reset Base Material. The ↺ button on the Material Setup header restores that material's shipped colour, roughness and surface values. It does not touch your imperfection layers; Restore Authored Stack is the equivalent for those.
Bevel
Default Metal and Default Plastic expose a Bevel radius that rounds shading on hard edges — this is what makes edge wear catch light convincingly. The authored collection materials do not expose it, because they carry their own hand-built bevel and bump work that a global bevel would overwrite.
SECTION 08
Material Looks
A Material Look is a complete saved setup — base material, every surface value, and the whole imperfection stack with its order, names, opacities and per-layer settings. Build a look once, reuse it on every prop in a set.
- Build a material on a mesh and tune its imperfections.
- Expand My Material Looks.
- Save the current look with a descriptive name.
- Apply it to any other mesh later.
Looks are stored in your Blender user configuration, so they follow you between projects.
You can export a look as a .json file to share it, and import one you have
been given.
Name them for the result, not the recipe: "Worn Red Painted Metal", "Subtle Dirty Rubber", "Rusted Industrial Panel". You will be scanning this list at speed six months from now.
SECTION 10
Live Mapping Compensation
Procedural and projected textures stretch when an object has unapplied scale, and edge effects drift when rotation is unapplied. MatricX can correct both live, without you applying transforms.
Live Scale Compensation
Keeps texture scale visually constant while you scale the object. Useful for procedural metals, wood and rubber patterns, box-projected imperfections, and anything you are still actively modelling.
Live Rotation Compensation
Keeps edge-based effects aligned when the object is rotated without applying rotation.
Both appear only when the selected mesh carries a compatible material.
Turn them off when you deliberately want mapping to stretch with the object, when a custom material uses its own coordinates, or when you are about to apply transforms and want standard Blender behaviour.
SECTION 11
Imperfection Studio
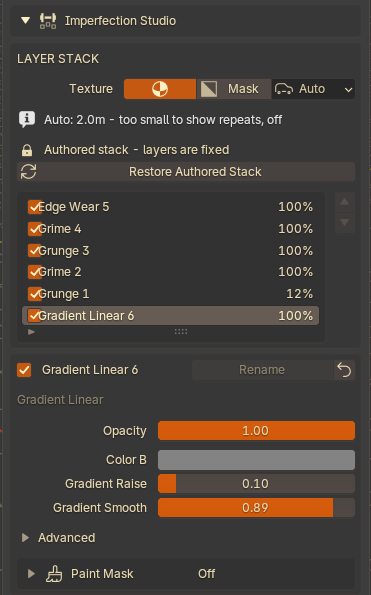
The Imperfection Studio is where a material stops looking new. Layers stack, reorder, and composite over one another — you are building a history, not applying a texture.
Adding a layer
- Apply a material that supports imperfections.
- Click Add Layer and choose a type.
- Select it in the list to edit its settings.
The arrows to the right of the list reorder layers. Duplicate copies the selected layer with its own independent settings, and the bin removes it.
Layer controls
Every layer has a name, an enable checkbox, and an Opacity slider — shown as the percentage in the list. Beyond that, each type exposes its own colour, scale, amount and surface-response controls, with the less-used ones tucked under Advanced.
A disabled layer keeps its settings. Unticking the checkbox hides the layer from the material without discarding your tuning, which makes it a good A/B switch.
Mask preview
Switch the view mode to Mask to see the active layer's mask alone, in greyscale — white is where the imperfection appears. This is the fastest way to understand what a scale or amount slider is actually doing before you commit to it.
Anti-tiling
Large surfaces reveal the repeat in any texture. The tiling control blends phase-shifted samples to break up the lattice.
| Mode | Behaviour |
|---|---|
| Auto | Matches object size — off below 12 m, 2 samples to 30 m, 3 samples above. The default. |
| Off | One sample. Cheapest, and correct for anything hand-scaled. |
| Fast | 2 phase-shifted samples. Removes the lattice at moderate cost. |
| High | 3 samples. Most varied, for very large surfaces. |
Reset a layer
Each layer has a ↺ reset that restores its type's defaults. MatricX asks for confirmation first, because it discards your manual tuning for that layer. It does not touch other layers or the base material.
SECTION 12
The 15 Imperfection Types
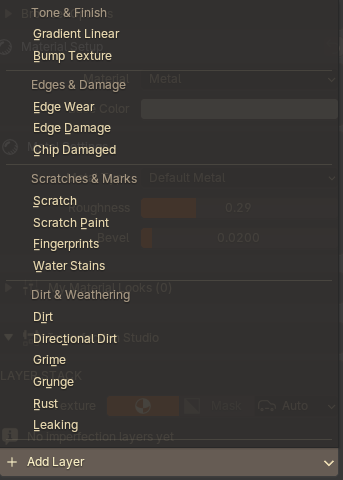
Tone & Finish
| Type | What it does |
|---|---|
| Gradient Linear | Blends a directional colour gradient across the surface. A tonal foundation rather than damage — MatricX always evaluates it beneath the physical layers. |
| Bump Texture | Fine surface grain and raised flakes, so the finish is not perfectly smooth. Writes the surface normal in place without adding a second shader. |
Edges & Damage
| Type | What it does |
|---|---|
| Edge Wear | Wears the paint or finish off exposed corners and edges. The randomness controls keep it from reading as a perfectly even outline. |
| Edge Damage | Chips and breaks up edges where they take impacts. Randomness varies the mask rather than just brightening it. |
| Chip Damaged | Deep chips cut into the surface, with real crater depth rather than painted-on marks. |
Scratches & Marks
| Type | What it does |
|---|---|
| Scratch | Cuts grooves into the surface with depth and self-shadowing. The Depth slider controls how dark the groove floor goes — that shadowing is what makes it read as cut rather than drawn. |
| Scratch Paint | Scratches that cut through paint to the material beneath. Use Amount for coverage and Detail Amount to break the strokes up along their length. |
| Fingerprints | Sparse oily fingerprint marks. Best at low opacity on gloss, glass and painted surfaces. |
| Water Stains | Dried water marks and mineral staining — soft, cloudy residue. |
Dirt & Weathering
| Type | What it does |
|---|---|
| Dirt | Loose particulate settling into recesses and cavities. |
| Directional Dirt | Dirt washed along one axis, as run-off or airflow leaves it. Use it for streaks and downward grime. |
| Grime | Thin handled residue clinging to open, air-washed surfaces — handles, rails, panels people touch. |
| Grunge | General-purpose grunge overlay with real carved depth. |
| Rust | Corrosion that eats into corners, seams and cavities. Keep the opacity restrained and pair it with edge damage. |
| Leaking | Vertical leak streaks and wet residue running down from seams and fixings. |
Which materials support which types
Not every imperfection makes sense on every surface, so MatricX only offers the ones that do. The Add Layer menu is filtered accordingly.
| Material | Available imperfections |
|---|---|
| Metal | All 15, including Rust. |
| Plastic | All except Rust. |
| Wood | Gradient Linear, Scratch, Chip Damaged. |
| Rubber | Edge Wear, Dirt, Grime, Grunge, Scratch Paint, Water Stains. |
| Leather | Gradient Linear, Scratch. |
| Special Mat | Camo: Dirt. Gradients: all except Gradient Linear. |
| Glass | None — glass uses its own Smudge and Crack controls in Material Setup. |
| Custom Material | None — your imported maps are the complete surface definition. |
SECTION 13
Paint Masks
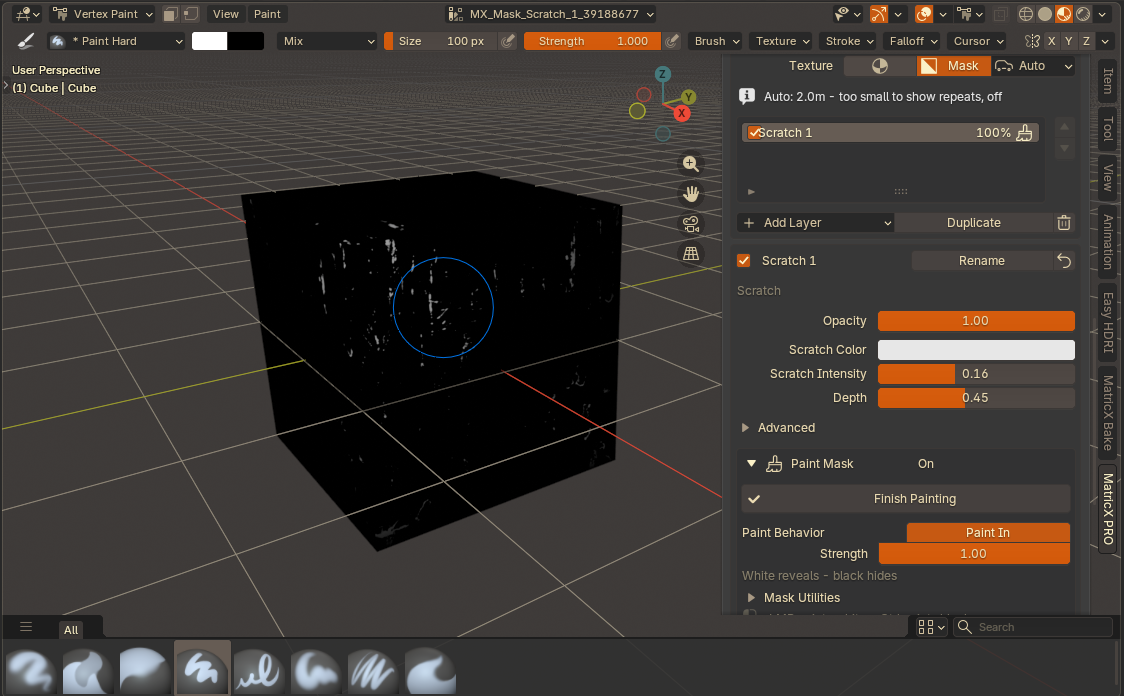
Procedural masks decide where an imperfection goes by rule. A paint mask lets you decide by hand — brush rust onto the one corner that should have it, wipe grime off the area a hand would have polished.
Painting a layer
- Select the imperfection layer you want to control.
- Expand Paint Mask and click Start Painting.
- MatricX switches to Vertex Paint and sets up a greyscale brush for you.
- Paint on the mesh. White reveals, black hides.
- Click Finish Painting when done.
Paint Behavior
Paint In is the default: the mask starts empty and white brushes the imperfection in. Turn it off to invert the meaning — the imperfection covers everything and black erases it. Choose whichever means less painting for the result you want.
Strength
Scales how much the painted mask affects the layer overall, without repainting anything. Pull it down to soften a mask that came out too strong.
Paint masks are vertex-based. Detail is limited by how dense your mesh is — a default cube has eight vertices and cannot hold a mask at all. MatricX warns you when a mesh is too coarse. Subdivide if you need finer control.
Mask Utilities
Fill the mask solid, clear it, or remove it entirely and return the layer to its procedural mask. Removing a paint mask does not remove the layer.
Multiple objects sharing a material: the mask lives on each mesh, so an object without one shows the layer at full procedural coverage. MatricX warns you when this applies and offers to add a mask to every object using that material.
SECTION 14
Custom PBR Materials
Custom Material imports an external texture set and turns it into a reusable MatricX entry.
- Set the category to Custom Material.
- Click + and select one or more texture files from the set's folder.
- MatricX scans the folder and identifies the maps by name.
- Check the detected entry, then click Apply Custom Material.
Maps detected
Base Color, Normal, Roughness, Metallic, Ambient Occlusion, packed ORM, Height, Emission, Opacity.
Controls
Uniform scale, rotation, offset, UV map choice, treat-as-metal, ORM mode, normal strength, displacement scale, alpha mode and clip threshold.
Entries are stored in add-on preferences and stay available across projects.
Imperfection layers are not offered on custom materials. Your authored maps are the complete surface definition — MatricX leaves them alone rather than compositing over work you already did.
SECTION 15
Decals Workspace
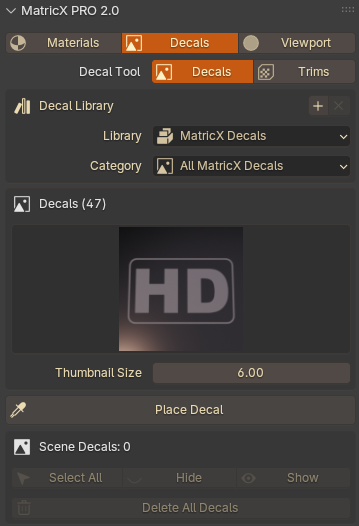
Placing a decal
- Pick a decal thumbnail.
- Click Place Decal.
- Move the cursor over a mesh surface — the decal aligns to the surface normal.
- Confirm.
| Input | Action |
|---|---|
| LMB / Space | Confirm placement |
| RMB / Esc | Cancel |
| Wheel | Rotate |
| Ctrl + Wheel | Fine rotate |
| Shift + Wheel | Scale |
| MMB | Orbit the viewport |
The adjustment pie
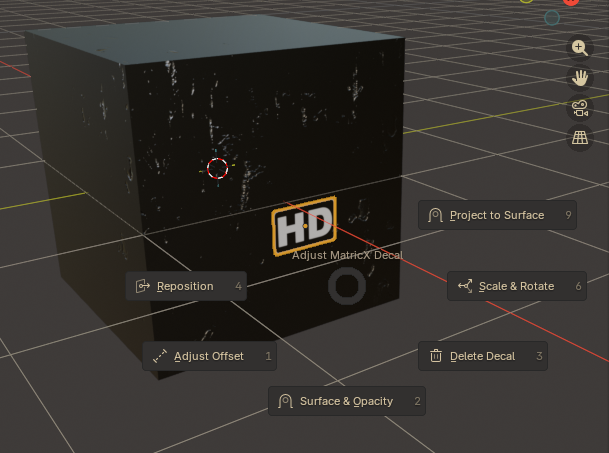
Key actions
- Reposition — move a placed decal to another point or another mesh, keeping its settings.
- Scale & Rotate — resize or angle without moving the placement point.
- Surface & Opacity — blend into the surface, and set the offset that prevents
z-fighting.
0.001 mis a good starting value. - Change Color — override a label or brand decal's colour instead of using its texture. Restore the original material to go back.
- Project to Surface — build final conforming geometry. Only the first surface along each ray is kept, so the decal never prints through to the far side of a closed mesh.
- Delete Decal, plus Select All / Hide / Show and Delete All Decals in the panel.
SECTION 16
Adding Your Own Decal Libraries
MatricX ships one official decal library. You can add as many of your own as you like, from the N-panel or from Preferences.
Adding a library
- Click + on the Decal Library header, or Add Library in Preferences.
- Select the folder that contains the decal subfolders.
- Optionally give it a name — otherwise the folder name is used.
MatricX validates the folder before accepting it and tells you if there is nothing usable inside.
Expected decal folder layout
My Decal Pack/ 001_some_decal/ decal.blend required decal.png thumbnail, recommended uuid optional, gives the decal a stable identity 002_another_decal/ decal.blend decal.pngRemoving a library
Click ✕ on the library header to remove the one you are browsing, or use the ✕ beside any entry in Preferences. Only the reference is removed — nothing is deleted from disk. The bundled MatricX library cannot be removed.
Duplicates are filtered automatically. If the same decal appears in two libraries,
MatricX shows it once. Identity comes from the uuid file when present, so give your
own decals unique uuids if you want copies treated as distinct.
Library references live in your Blender user configuration, not inside the add-on, so they survive reinstalling MatricX and are available in every file.
SECTION 17
Trim Sheets
MatricX does not ship trim sheets. The Trims tool is fully functional, but the sheets themselves are yours to supply — add a folder of your own and it appears here.
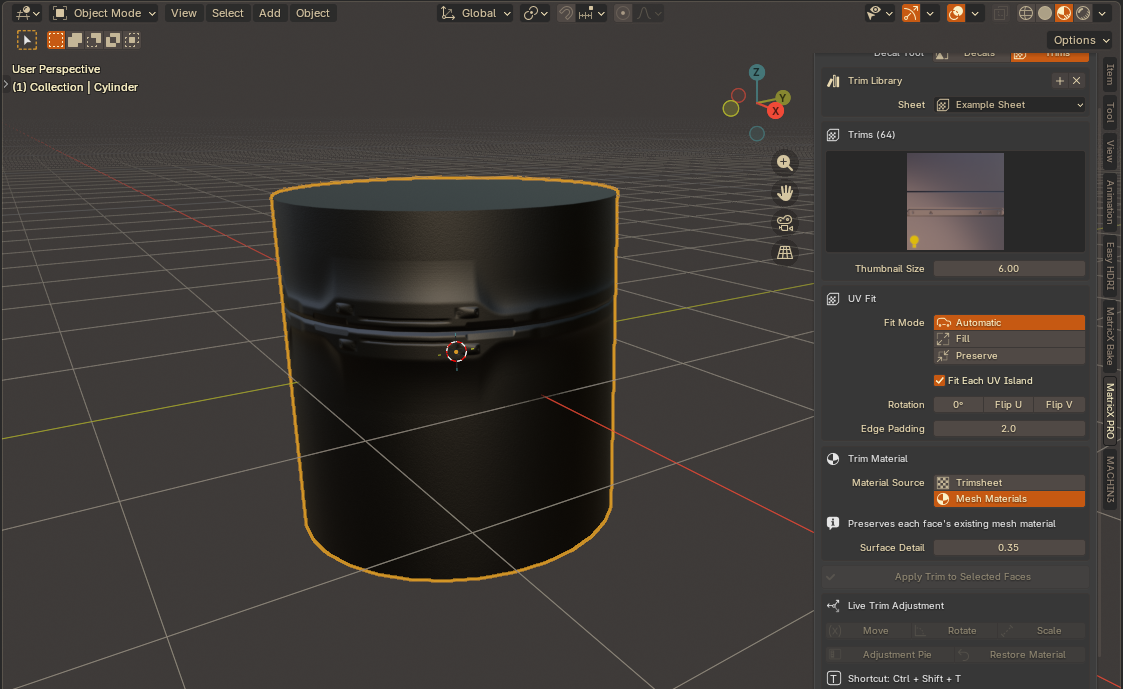
Applying a trim
- Enter Edit Mode and select the faces that should receive the trim.
- Open Decals → Trims and pick a sheet, then a trim region.
- Choose the UV Fit and material options.
- Click Apply Trim to Selected Faces.
- Refine with Live Trim Adjustment if needed.
UV Fit
| Option | Behaviour |
|---|---|
| Automatic | Picks the sensible fit for the selection. Start here. |
| Fill | Stretches the selection to fill the trim region. Fast for panel strips. |
| Preserve | Keeps more of the existing UV proportions. Use when face proportions matter. |
| Fit Each UV Island | Fits each island separately — good for repeated strips, wrong for one continuous area. |
| Rotation / Flip U / Flip V | Correct orientation without re-selecting. |
| Edge Padding | Insets the UVs slightly to stop neighbouring regions bleeding in. |
Trim material
Trimsheet assigns the sheet's own material. Mesh Materials preserves each face's existing material and applies only the UV placement — use it when the trim geometry is right but the surface should keep matching the rest of the model. Surface Detail scales the bump contribution.
Live Trim Adjustment
Move, Rotate and Scale refine the placement after applying. Move adjusts location only — scaling is a separate action, so vertical cursor movement will not resize by accident. The adjustment pie is Ctrl+Shift+T in Edit Mode.
Trim sheet folder format
A trim sheet folder is identified by a data.json describing the atlas and its regions.
The data.json needs a resolution pair and a trims list.
Each trim needs coords and dimensions in 0–1 UV space:
Decal and trim libraries are kept apart on purpose. MatricX detects which kind a folder holds and shows it only in the matching mode, so a full trim sheet can never be placed as an ordinary decal by accident.
SECTION 18
Viewport Workspace
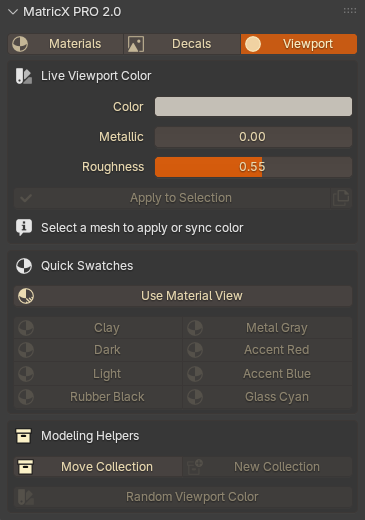
Live Viewport Color
Set Color, Metallic and Roughness, then Apply to Selection. Once assigned, the controls edit that material live, and selecting another object with a MatricX viewport material syncs the panel to its values.
Quick Swatches
Clay, Dark, Light, Rubber Black, Metal Gray, Accent Red, Accent Blue and Glass Cyan. Use Material View switches your viewports to Material Preview so the colours actually show.
Helpers
- Random Viewport Color — a different colour per selected mesh, for separating a busy blockout.
- Move Collection / New Collection — organise the selection without leaving the panel.
- Separate Material — stop one mesh sharing a viewport material with the rest.
Viewport materials are protected. MatricX will not overwrite a production material with a viewport colour — it tells you how many selected objects it skipped and why.
SECTION 19
Preferences and Runtime Assets
Edit → Preferences → Add-ons → MatricX PRO.
- External Asset Pack — the path, a Locate button, and a live status line.
- MatricX Decals & Trims — decal and trim counts, pie shortcuts, and Refresh Libraries.
- Additional Libraries — every library you have added, with its path, what it contains, and a ✕ to remove it. A folder that has gone missing is flagged but stays listed so you can still clear it.
- Update and support links.
Runtime asset status
With a valid pack, MatricX can load material files, runtime and imperfection textures, and the official decal library. Without it, the browser still shows thumbnails — those ship in the add-on — but applying a material will fail until the pack is located.
Cross-platform paths
MatricX 2.0 resolves paths without platform-specific separators and tolerates case differences,
so projects move between Windows, macOS and Linux. For shared setups, use the locator or
MATRICX_ASSET_ROOT rather than hard-coding paths into project files.
SECTION 20
Recommended Workflows
Fast hard-surface material
- Apply Default Metal or Default Plastic.
- Enable live scale and rotation compensation if the object still has unapplied transforms.
- Set base colour, roughness and bevel.
- Add subtle Edge Wear.
- Add low-opacity Dirt or Directional Dirt.
- Add Scratch, Fingerprints or Water Stains only where they earn their place.
- Save it as a Material Look if you will reuse it.
Start from the collection instead
- Apply one of the 17 authored materials — the stack is already built.
- Tune Base Color and Roughness to your asset.
- Adjust individual layer opacities to taste.
- Press Restore Authored Stack if you want the original recipe back.
Rusted metal
- Apply a metal material and add Rust.
- Tune its sharpness and surface detail; keep opacity restrained.
- Add Edge Damage for chipped areas.
- Add Dirt at low opacity to unify everything.
- Paint the rust mask so corrosion collects where water would actually sit.
Hand-placed wear with paint masks
- Build the layer and get its procedural look right first.
- Start painting, and set Paint Behavior to whichever direction means less brushing.
- Use Mask view to check coverage as you go.
- Finish Painting, then lower Strength if the result is too strong.
Modelling blockout
- Open Viewport and click Use Material View.
- Assign quick swatches by part group, or use Random Viewport Color.
- Organise with the collection helpers.
SECTION 21
Troubleshooting
The browser shows thumbnails, but applying a material fails
Thumbnails ship in the add-on; the material files are in the asset pack. Open Runtime Assets and click Locate Asset Pack.
"No trim sheets added yet"
Expected. MatricX does not include trim sheets — click Add Trim Sheet Library and point it at a folder of your own. Locating the asset pack will not help; there are none in it.
An imperfection covers far too much
Lower the layer Opacity first, then the type's Amount control. Switch to Mask view to see exactly what the mask is doing.
The Add Layer menu is missing a type
The list is filtered to what the current material supports — see the table in Section 12. Glass and Custom Material offer none by design.
I cannot add or delete layers on a collection material
Authored stacks have fixed contents. You can still reorder them, edit every value, and press Restore Authored Stack to undo your changes.
Painting says another layer is being painted
A different layer owns the paint session. Click Finish That Session and start again on the layer you want.
My paint mask is blocky
Masks are vertex-based, so resolution follows mesh density. Subdivide the mesh where you need finer control.
A decal appears twice
Refresh libraries and check the same folder is not added twice in Preferences. MatricX de-duplicates by uuid, so decals copied without unique uuids may look repeated.
A trim applies to more than the faces I selected
Confirm you are in Edit Mode with only the intended faces selected, and check Fit Each UV Island matches your intent.
A pie shortcut conflicts with another add-on
Preferences → Keymap, search for matricx.show_decal_pie or
matricx.show_trim_pie, and rebind or disable.
A fabric material looks flat and wrong
Fabrics sample through the UV map. Without one the weave collapses to a single sampled point — MatricX warns you and offers to add a UV map.
SECTION 22
Support
Use the official Eidos Edge links in MatricX Preferences for support, updates and demos.
When reporting a problem, include:
- Blender version and operating system.
- MatricX PRO version, and whether you installed the add-on or the extension package.
- Whether the asset pack is connected — Preferences shows the status.
- A screenshot or short recording.
- A minimal
.blendwhere possible. - The exact steps to reproduce it.
Thank you for using MatricX PRO.
— Prasanth · Eidos Edge · MatricX PRO Developer